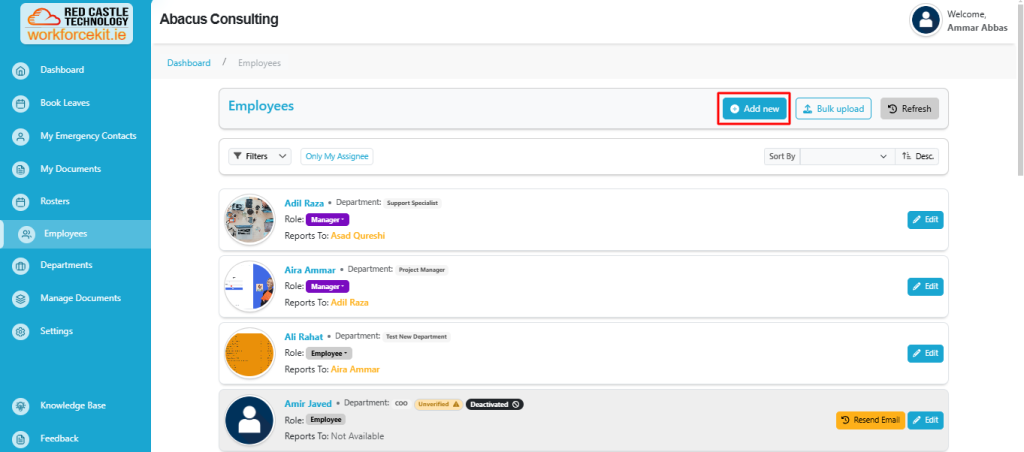
In this section, users have access to a comprehensive list of employees added by the Admin or Manager.
Employees/Filter Section
This document provides a detailed guide on how to use the filtering system and controls in the Employee Management section. The interface includes various filters to refine employee searches, options to add or manage employees, and functionalities to control sorting and refreshing the data.
Employee Management Controls
The Employee Management section also includes key functionalities to streamline user actions:
Add New Button: Opens a form to add a new employee to the system.
Bulk Upload Button: Allows mass employee uploads via an external file.
Reloads the employee list to reflect the latest updates or changes.
Sort By Dropdown: Allows users to sort employee records based on different criteria.
Order Selection (Ascending/Descending): Provides an option to arrange data in ascending or descending order.
Only My Assignee Toggle Button
When enabled, filters the employee list to display only those assigned to the logged-in user.

The filters panel is accessed by clicking on the *Filters* button. The available filters are structured into different sections:
The filters panel is accessed by clicking on the Filters button. The available filters are structured into different sections:
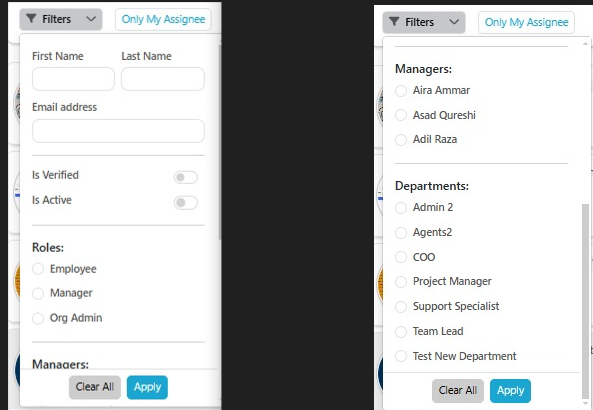
Personal Information Filters
First Name & Last Name: Text fields where users can enter specific names to search for employees.
Email Address: Allows filtering by email to locate a specific employee.
Status Filters
Is Verified (Toggle Switch): Filters employees based on their verification status. Switch ON to show only verified employees. Switch OFF Includes unverified employees.
Is Active (Toggle Switch): Filters employees based on active status.
Switch ON to show only active employees. Switch OFF Includes inactive employees.
Role Filter
Enables filtering based on the employee’s role within the organization. Available roles are Employee, Manager and Org Admin.
Manager Filter
Users can select a manager from a predefined list. This filter helps in viewing employees reporting to a specific manager.
Department Filter
Allows filtering employees based on their department. Selecting a department refines the list to only employees belonging to that category.
Apply and Clear All Buttons
Apply Button: Confirms the selected filters and applies them to the employee list.
Clear All Button: Resets all selected filters to default.
Adding a new Employee
Admin user possess the privilege to swiftly add a new employee by selecting the “Add New” button.
After clicking the “Add New” button, the admin user is directed to the employee form page where they can input the necessary details. These details are divided into two sections:
First Section:
- First Name (Mandatory)
- Last Name (Mandatory)
- Gender (Optional)
- Home Number (Mandatory)
- Mobile Number (Mandatory)
- Office Number (Mandatory)
- Work Email (Mandatory)
- Personal Email (Optional)
- Department (Mandatory)
- Job Title (Mandatory)
- Job Commencement Date (Mandatory)
- Date of Birth (Mandatory)
- Leaves Quota (Mandatory)
- Carry Over Days (Mandatory)
- Medical Conditions (Optional)
Second Section:
- Address Line 1 (Mandatory)
- Address Line 2 (Optional)
- Town (Mandatory)
- City (Mandatory)
- Country (Mandatory)
- Post Code (Mandatory)
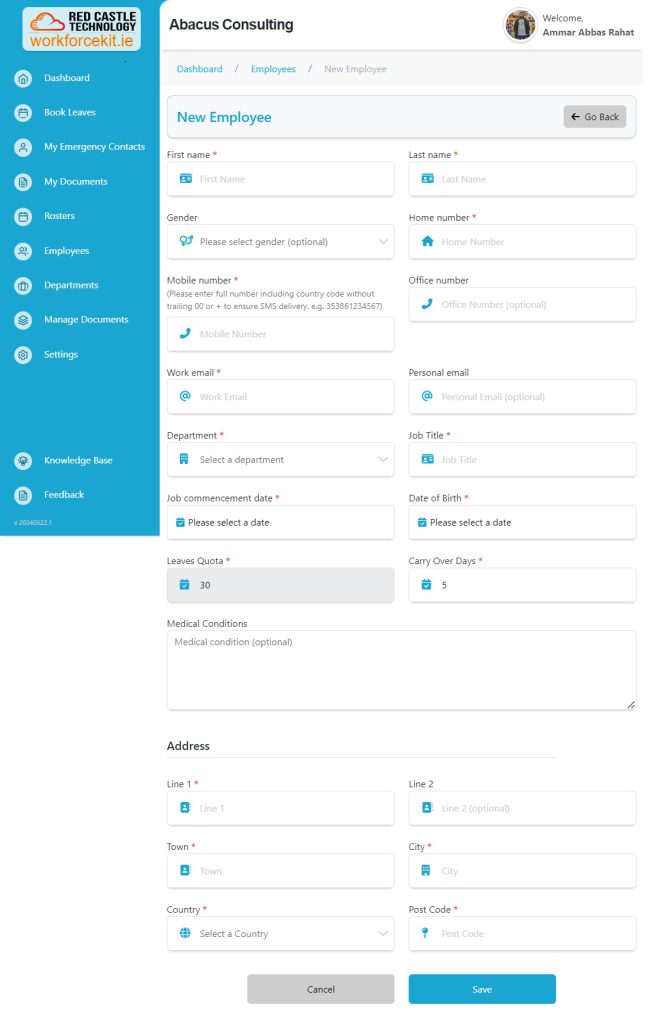
Once all details are filled in, the user simply needs to click the “Save” button to finalize the employee creation process and save the details.
Note: The user does not has access to Edit Work Email details.
Resend Email
Upon creating a new employee, the user gains access to the “Resend Email” option, enabling them to trigger a new email for the employee to register their account.

Note: Unverified users will remain deactivated until they successfully register their accounts.
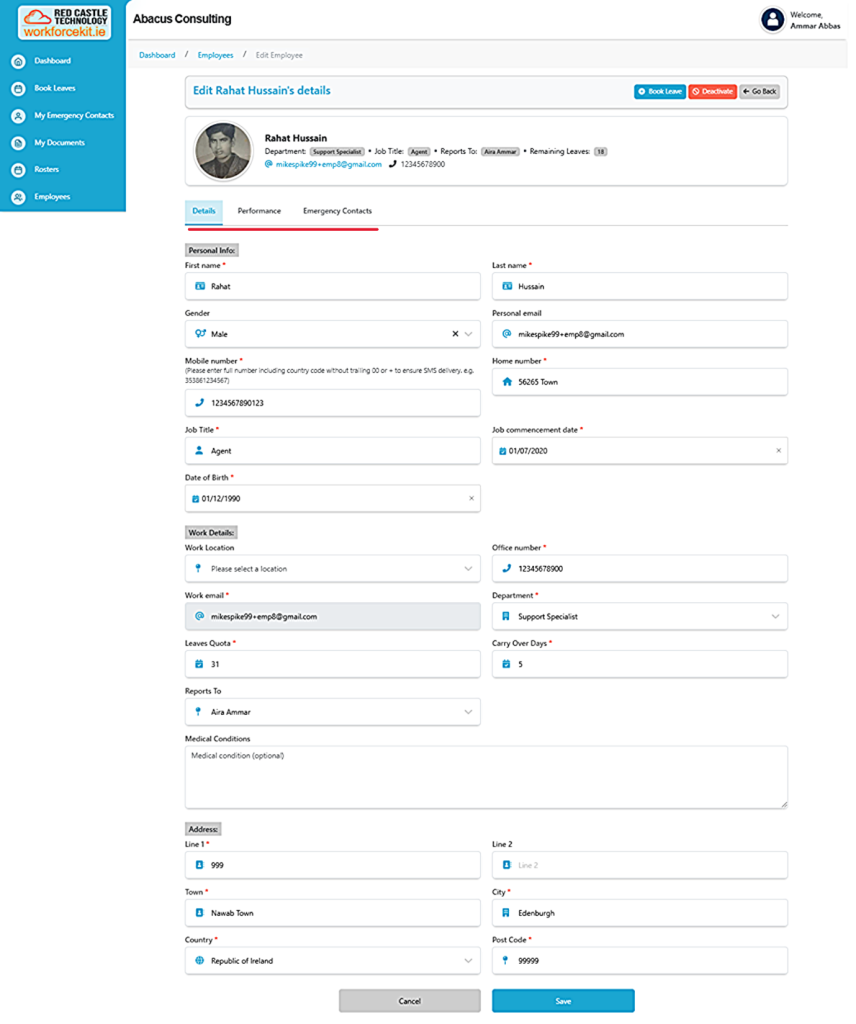
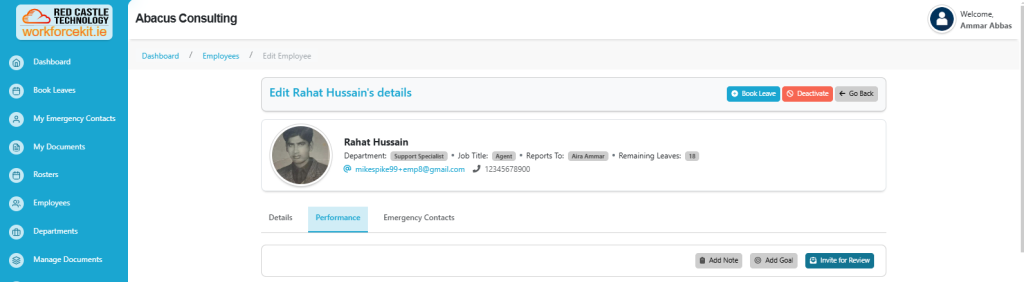
Employee Edit Screen
By clicking the Edit button, the user can access and modify an employee’s details.

The user will see three tabs: Details, Performance, and Emergency Contacts.
Details Tab
By default, the Details tab will be open, allowing the user to update various employee information, including First Name, Last Name, Gender, Home Number, Mobile Number, Office Number, Personal Email, Department, Job Title, Job Commencement Date, Date of Birth, Leave Quota, Carry Over Days, Reports To, Medical Conditions, Address Line 1, Address Line 2, Town, City, Country, and Post Code.
Performance Tab
Within this tab, the user can Add Notes, Add Goals and Invite for Review.
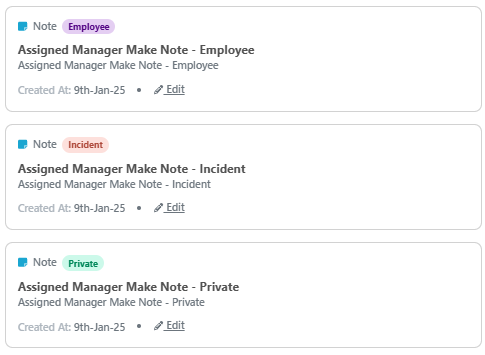
Add Notes
The user can set notes for employees by clicking the “Notes” button, which will trigger a right-side modal to open.
User can add notes by providing details such as Subject, Visibility(Employee, Private or Incident) and Details. After filling in all the necessary information, users can save the notes by clicking the “Save” button.
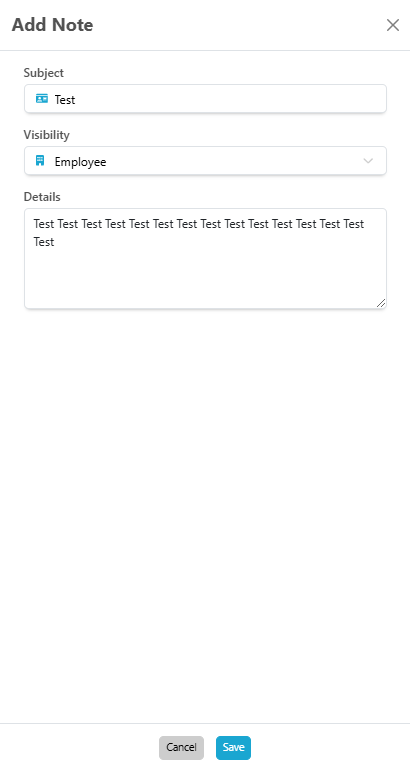
Furthermore, users have the capability to edit existing notes as needed, providing flexibility in notes management.
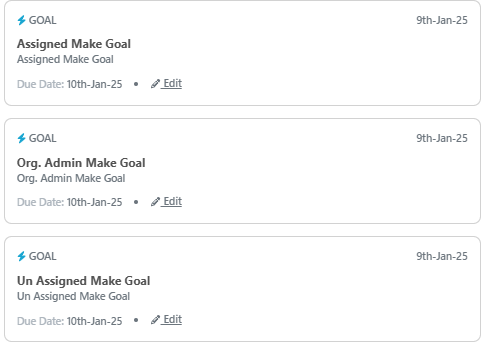
Goals
The user can set Goals for employees by clicking the “Goals” button, which will trigger a right-side modal to open.
User can add Goals by providing details such as Name, Description, Set Date and Due Date. After filling in all the necessary information, users can save the Goals by clicking the “Save” button.

Furthermore, users have the capability to edit existing goals as needed, providing flexibility in goal management.
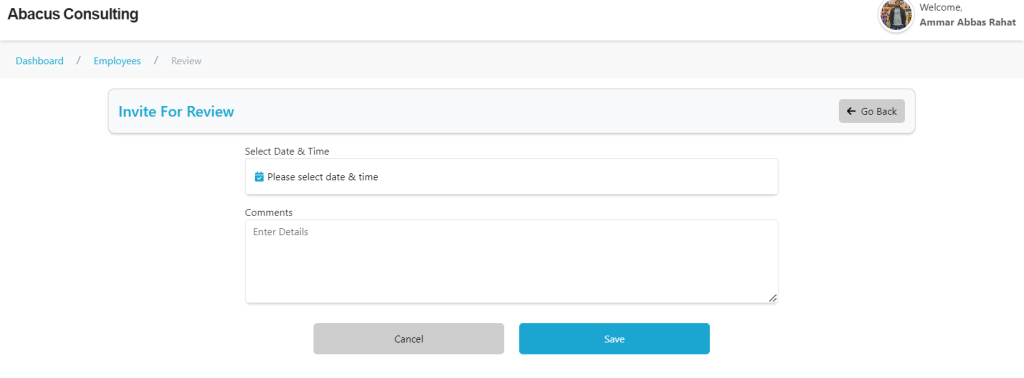
Invite for Review
User can Invite for Review to employees by navigating to the “Invite for Review” tab, which redirects them to the Invite for Review section.
Users are empowered to invite employees by navigating to the “Invite for Review” tab. Upon clicking this tab, users are directed to the invite for review section, where they can seamlessly extend invitations to any employee within the organization.
In this section, users can select a date and time, add any relevant comments, and then proceed to save the details by clicking the “Save” button. Upon saving, an email notification will be sent to the designated employee.
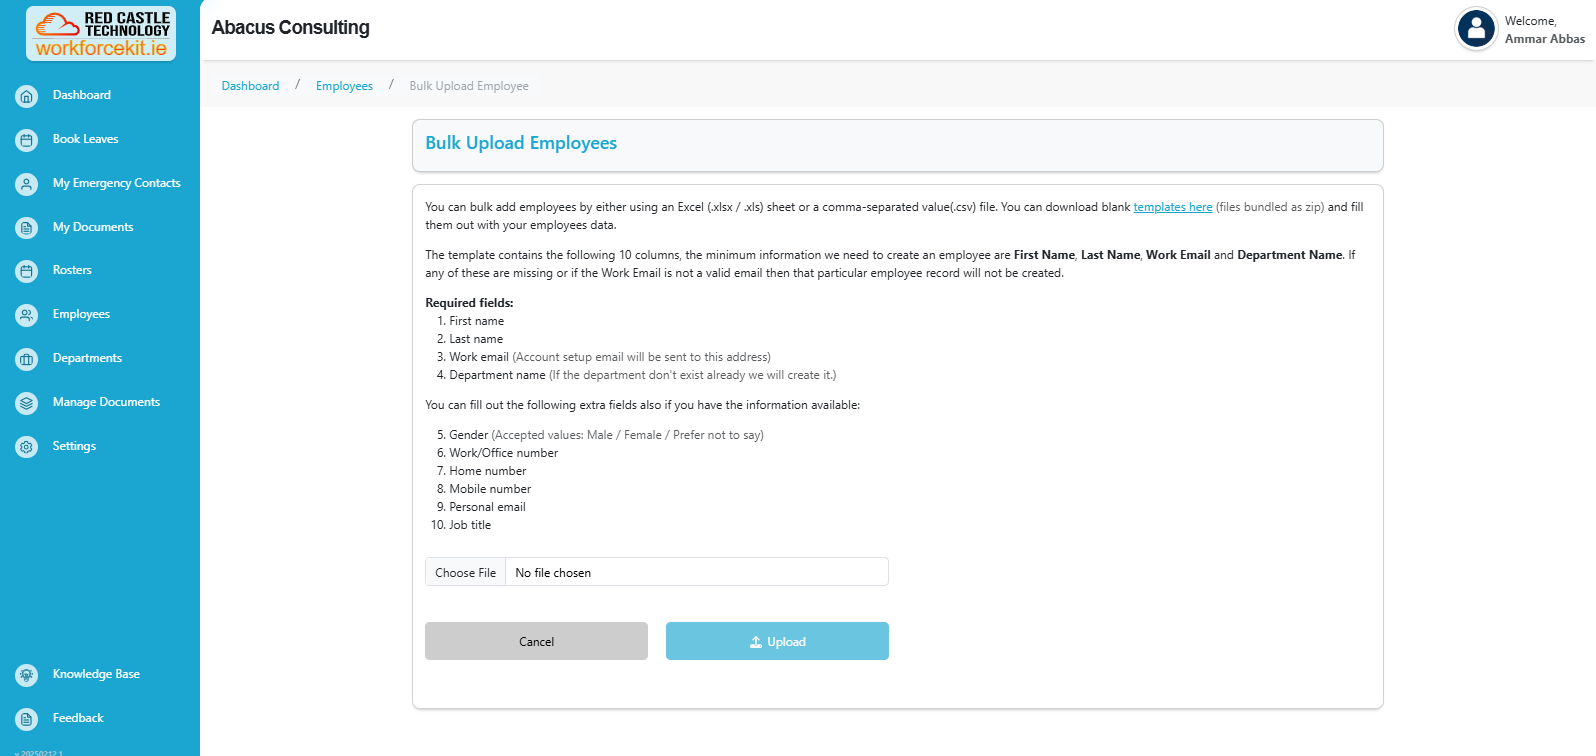
Bulk Upload
Users have the capability to streamline the process of adding multiple employees simultaneously through the convenient “Bulk Upload” button feature.

Upon clicking the “Bulk Upload” button, users are prompted to upload an Excel (.xlsx / .xls) sheet or CSV file containing employee details. Additionally, users have the option to download a template providing guidance on how to populate the required employee information. This template facilitates seamless completion of employee details and subsequent upload for bulk processing.